Sunday, June 30, 2013

Coconut Cream Cake


My daddy is coconut lover from way back, so it really wasn't a big surprise when I asked him what kind of dessert he'd like to have for Father's Day, that he requested coconut cake.  I make a really good rich and creamy Italian Cream Cake that has coconut in it, but for this occasion I wanted something a little lighter, not quite as rich---and I remembered this old favorite from long ago, one we haven't made in I-don't-know-when, Coconut Cream Cake. 

And as you can see from the picture above, we broke out the fine china, as well as adding a little vanilla ice cream on the side.  I love formal dining, don't you?


Ingredients:
  • 1 yellow or white cake, prepared
  • 1 container cool whip
  • 1 can cream of coconut (find this in the alcoholic drink mix aisle, next to the margarita mix--this is one of the ingredients in a pina colada)
  • grated or flaked coconut


Step 1: Make a plain white or yellow cake.  I used Duncan Hines Butter Recipe Golden cake mix, but I "doctored it up" and made my Sour Cream Pound Cake From a Mix, but you can make one from scratch or just a regular cake mix cake if you'd like.  (Hint: If you use a cake mix, use a good one) (Second hint: make it in a 9 x 13 pan that you don't mind taking somewhere or serving from, because this cake stays in the pan.  Don't use that favorite old one that has the black stuff all around the edges that can't be scrubbed off no matter how hard you try, even with a brillo pad.)


Step 2: Poke holes all over the cake with a fork 


Step 3: Mix together the cool whip and 3-4 T of the coconut cream.  (Hint: it's easier to do if you put it in a bowl that's big enough to really stir it around instead of trying to do it in the cool whip container)


Step 4:  Pour the remaining cream of coconut all over the cake in the pan, and allow it to soak in.


Step 5: Spread the coconut-flavored cool whip on top of the cake


Step 6: Sprinkle liberally with coconut.  Actually, just kind of gob it on all over the cake.


Step 7: And this is important--cover it refrigerate for several hours, preferably overnight.  The longer this sits, the better it gets.

This cake was big hit with my Dad, as well as the rest of the family.  This recipe is one of those that everybody made "back in the day" and somehow fell by the way side, but when you make it again after a long time, you think "Why did we ever quit making this, this is good!" kind of recipes. 

Note: You could add some crushed pineapple to the cake batter, or maybe even drain some and spread on top after you soak the cake in cream of coconut, and it would be a Pina Colada Cake.  As a matter of fact, I think we made something like that "back in the day" as well.

What old favorites have you baked up for your family lately?

Until next time, good cooking, and good eating....

This post is linked to:
Church Supper at Everyday Mom's Meals
Meatless Monday at My Sweet and Savory
See Ya in the Gumbo at Ms enPlace
Sweet and Savory Saturday at Dessert Now, Dinner Later

Sunday, June 23, 2013

How to Freeze Purple Hull Peas


Field peas of different varieties are a staple of a southern kitchen, and my personal favorite, as well as most of my family, are purple hull peas.  Mississippi pink eye purple hulls, to be exact.  (You can see pictures of some of them growing on my other blog on the on the post I did last week about my parent's garden.)

It's wonderful to eat fresh vegetables in season, especially home-grown, but part of the fun of having a garden is to be able to "put up" some to eat later.  Preserving food is, to me, both an art and a science, and no one wants to waste time or money "putting up" food that doesn't taste good, or heaven forbid, goes bad. Canning, freezing, drying, pickling and preserving, there are a myriad of ways to do it, and some foods just take better (and taste better) if they're done a certain way, and purple hull peas, in my opinion, are one of them, and the way that they taste best is frozen--IF--and that's a big "if"--they're done the right way!

And what is the "right" way of freezing purple hull peas?  I'm about to show you the secret.

And what is the secret? 

Blanching and shocking.

And I'm about to show you how!


This is a dishpan full of peas, peas, glorious peas.  I love running my hands through a pan full of freshly shelled peas. I don't even know how to tell you how they feel, cool and just slightly moist to the touch; I feel like Midas counting my gold when I play with peas. (Yes, my momma told me not to play with my food, but this is fun!).

This dishpan full was from about a bushel and half of unshelled peas, or about 13 1/2 pounds (General speaking, purple hulls weigh out at 9 pounds a bushel, unshelled.)


Although my parents wash the peas in the shell twice before they go through the sheller, the first step is always to wash them twice again. 


My mom has her techniques down to a routine--fill one dishpan with water, then swish around and lift them into a second pan...


...she gets a rhythm going, of swish and plop...


And when she finishes the first washing...


...she adds water and does it all over again...


....to still another dishpan.


Swishing and plopping (they're my own technical terms)...


...until we have another dishpan full of lovely washed peas.  (not fun to handle after they're wet)


Then she drains the water from the dishpans....


...and this is secret number one--try to one of these little strainers, or you will fill you drain up with all of the little goopy things that come off the inside of the shells. 

(And you will need your sink to be fully functional, this is a sink-intensive task)


Secret number two--use a blanching pot, which is large (think soup-size)  pot with an insert like the one above, which makes putting the peas or other vegetables in and out of the boiling water much easier. 
 (You don't have to have one of these, but trust me, it's much easier if you do.)


Secret number three--don't fill the pot full, you need to leave room for the water to boil, with vegetables in it, without overflowing.   


Secret number four--it's much easier if you have two blanching pots, or at least two inserts, so you can speed up the blanching time by having one in the pot, and one ready to go when the first one gets ready.


Secret number five--don't over fill the blanching pot insert (see secret number three)


Secret number five--while you're waiting for the water to boil, pre-mark your freezer bags with the date so that next year you'll know how long things have been in your freezer.  If you freeze mystery food, you may want to include what's being frozen, but peas are pretty much self-evident.  (My parents use a code instead of the date.  They're mysterious like that.)

Secret number six--use a good quality freezer bag, not a storage bag, to put things into the freezer.  Don't waste your time and money, not to mention your good produce, by using cheap bags that aren't made for long-term storage.


And now--step one--once the water comes to a boil, put the peas (or whatever vegetable you're putting up) into the water, and bring back to a boil.  Stir a little to make sure the boiling water is coming into contact with all of the food being blanched. 

Guess what?  You're blanching!


Skim off the foam and stuff that floats to the top.

And now for the tricky part--each different vegetable blanches differently.  Small things, like peas, take less time than something big, like and ear of corn. 

We did these about 3-4 minutes after the water was boiling again.  My mother is magic, she just knows when it's been long enough.
(Actually, she's done this so long, she goes by the look of the peas when they're about done.)


Now you're ready to shock the peas---no, no, you don't have to tell them your deepest, darkest secrets, you just have to cool them off rapidly, to stop the cooking process.  This is done with water and a lot of ice.

And on to secret number seven--it takes a lot of ice.  A lot.  Your ice maker cubed ice is not enough.  Some people buy bags of ice, but don't waste your money--little pieces of ice melt too fast, you need big ice, so make ice ahead of time in recycled plastic bowls.  (Don't use your good tupperware, most of them will spit after they've been frozen a few times--once these split, we send them to plastic heaven and get more out of our saved-all-year-for-this-purpose-stash)


Fill one side of the sink with water, and throw in some cool-whip-bowl ice.


Take the insert and rinse it with cool water from the tap, swishing around to cool off the pot...


(rinsing it first in tap water cools off the pot and keeps it from melting the ice too fast)


Put it over in the ice water side and continue to rinse until the vegetables are cool.


Guess what? 

You're shocking!

(Not, you are shocking (noun) as in you are a shocking person--you are shocking (verb), as in you are blanching and shocking to put vegetables into the freezer!)


Next step--bag them up! 


A hundred years ago when all of us kids were at home, we used to make what we called "fat quarts"--as much as we could fit in the bad and it close properly--now mom and dad make "skinny quarts" so they don't have to eat peas for a week at a time--although peas are even better when they're left over and heated up, but even the best thing gets old after a while.

We make a game of it--when the peas are still in the dishpan, we all take turns guessing how many bags we'll end up with--and this time, we had 11 quarts (some fat, some skinny) which I got to take home to my house and put in my freezer! (One last secret--spread the bags out in your freezer in a single layer, if possible, until they're well frozen, and then stack them, that way you know everything is frozen in a timely manner)

Note: I know of some people who cook their peas completely before freezing or canning, and that works, but you miss that just-cooked-fresh-from-the-garden taste that you get from doing it this way.  I've also heard of people who just shell their peas and freeze them in big bags without the whole blanching and shocking process, but we don't like the way they taste or keep that way.


If you want to see the process I use to cook peas that have been frozen like this, you can my Pass the Peas, Please post.

So now you know the Secrets of this Southern Kitchen when it comes to "putting up" peas--and many thanks to my mom and dad for letting me take picture of the process. (My mother has threatened me if I show her face--one of these days I'm going to sneak one in!) This was just the first picking, and a small one at that--my folks have already put up over 70 quarts of green beans alone, there's no telling how many quarts of peas will come from their garden this year. So needless to say, I trust their experience and their expertise.


Until next time, good cooking, and good eating!

This post is linked to:

See Ya in the Gumbo at Ms enPlace
Meatless Monday at My Sweet and Savory
Make Your Home Sing Monday at Mom's the Word
Metamorphosis Monday at Between Naps on the Porch
Tuesday Garden Party at An Oregon Cottage
Teach Me Tuesday at Growing Home Blog
Works for Me Wednesday at We Are THAT Family
Wow us Wednesday at Family Home and Life
Homemaking Party at Hope in Every Season

Monday, June 17, 2013

Cooking From the Pantry--Taco Tamale Pie


Ever have those days where you suddenly wake up and realize that it's getting close to 5;00 p.m. and you have no idea what you're going to make for dinner?  I hate to admit it, but sometimes I have those days two or three days a week. Luckily, I have a family that's easily pleased, but you still want to have something that's not only edible but tastes good, too!

So on one of those days last week, I was standing in the middle of my kitchen mumbling to myself thinking out loud--"let's see, I have a pound of ground meat that's about half thawed, what do I have that I add to it to make something nutritious that my family will eat?" And I came up with this, a cross between taco casserole and tamale pie, I call it "Taco Tamale Pie".  Clever, right?

It was super easy and big hit, and is now enthroned on my list of last-minute go-to meals. 


 Ingredients:
  • 1 lb ground meat
  • 1 can whole kernel corn
  • 1 or 2 pkg taco seasoning (I started with 1 and added an additional 1/2 pkg)
  • 1 pkg cornbread mix
  • 1 egg
  • 1/3 c milk (enough to make the cornbread)
  • cheese


Step 1: Brown the ground meat, and drain if necessary.  We have farm-raised beef, so all of the water usually cooks out by the time the meat browns, and there's very little fat to drain.  If you're using commercial ground meat, you will almost definitely need to drain it.


 Step 2:  Add the corn and taco seasoning (I ended up adding and additional 1/2 envelope to off-set some of the sweetness from the corn) and just enough water to mix it all thoroughly.  (If you don't use commercial taco seasoning, use the equivalent of your homemade seasoning blend) Bring to a bubble, cover and simmer for a few minutes. 


Step 3: Mix the cornbread according to package directions.  Mine called for one egg and 1/3 cup of milk.  If you want to whip up cornbread from scratch, I'd recommend about a half recipe.   


Step 4: Take the lid off of the skillet and allow the liquid to evaporate until the meat mixture is almost dry.  Pour into a greased 9 x 9 inch casserole dish.


Step 5: Add cheese.  I realized I didn't have enough grated cheese, so I grabbed some sliced cheese and threw it on top.  We like lots of cheese.


Step 6: Pour the cornbread batter on top of the meat and cheese, and spread to the edges. 


Step 7:  Bake at 375-400 degrees for20-25 minutes, or until the cornbread is beginning to brown and seems "set" in the middle.  


I served this with fresh sliced cucumber and carrot sticks, I think it would also go nicely with a green salad. 
We all liked this, a lot.  Even the leftovers disappeared by the time everyone made it to bed. 

Until next time, good cooking, and good eating!

This post is linked to:

See Ya in the Gumbo at Ms enPlace
Church Supper at Everyday Mom's Meals
Melt in Your Mouth Monday at Make Ahead Meals for Busy Moms
Make the Scene Monday at Alderberry Hill
Recipe Sharing Monday at Jam Hands
Make, Bake, and Create at Hope in Every Season
Wonderful Food Wednesday Mom's Test Kitchen
Foodie Friday At Rattlebridge Farm

Monday, June 10, 2013

Fried Summer Squash


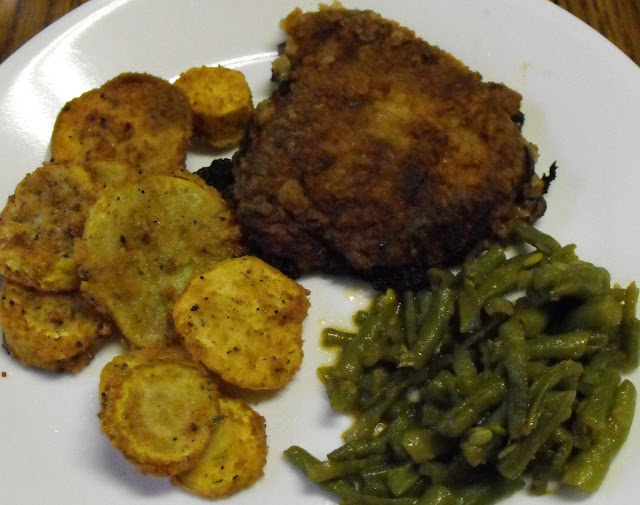
Last night I broke down and did something I don't do very often--I fried.

Two things--steak and squash. 

I love fried food--what self-respecting southerner doesn't--I mean, we'll take anything and batter it or roll it in cornmeal or flour and fry it, and I mean anything, from meat to vegetables to cheese to ice cream and candy bars.  I think I've even heard of fried twinkies, back in the days when twinkies were still around. 

Fried food is everywhere in the south, and I eat my fair share of it.  I just don't like to do it. Not because I'm all that health-conscious, although I should be more health-conscious, and shouldn't we all. 

No, I have to confess, I have no noble reason for not frying more food at home, I just despise the clean-up afterward.  Everything has to be dipped in so many things--water, eggwash, cornmeal, flour, batter, whatever, each requiring a seperate bowl.  And then the grease.  All over the stove.  And however good it may be in the moment, I feel like I can smell it in my kitchen for days afterward. 

But every now and then--especially this time of year, when it seems like all of the vegetables in the garden are starting to get ready all at once, we have a little "fry-fest".  More of a "fry-feast", actually.  Last week my mother had one, and we were invited.  She fried up a big ol' mess of zuchinni and squash, and we ate our fill of perfectly delcious healthy vegetables, rolled in seasoned cornmeal and flour, and fried to within an inch of their lives. 

It was delcious. 

We both make a much healthier version these days that we bake, but every now and then you just need to break down and do it the good old fashioned way.  

This week was my turn to go frying spree.  

I made southern fried steak, fried squash, and cooked-to-pieces green beans.  All home grown, too, even the beef. 

I'll share a little about the steak and green beans at another time, but this squash was so good, I have to give you this method.

Most of the time when you get fried squash, okra, etc, it's battered, and that's good, but my family tradition is to make it more very lightly breaded, and that's what I did.

Ingredients:
  • yellow summer squash, sliced
  • seasoned bread crumbs
  • flour
  • Tony Chachere's Seasoning or any good all-purpose seasoning
  • oil for frying


Step 1:  Slice the squash.  I like mine farily thin, maybe 1/4 inch or less. 

Step 2: Wet--I just put all of the sliced squash in a bowl and filled it with water, then fished them out as I needed them.  You can use an egg wash instead of water if you want the breading thicker.  Sometimes I do, sometimes I just use water for a lighter breading. Because I was frying steak, tending to the green beans, etc, I opted for water instead of egg wash; egg wash tends to be a little messier in my opinion, and I try to not use it if I'm distracted by other things multi-tasking. 


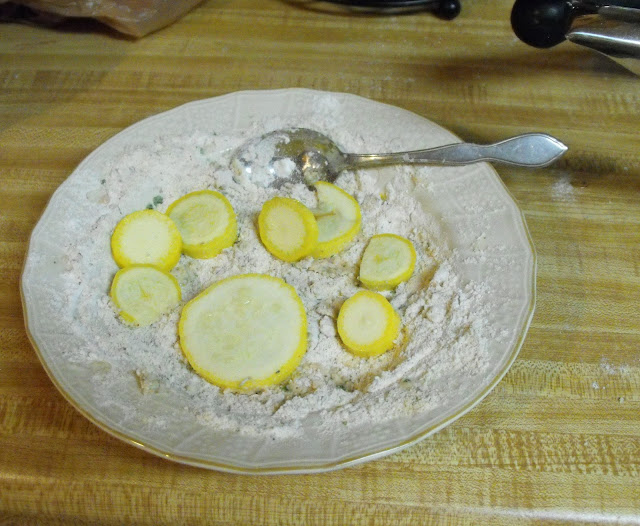
Step 3: Bread--I used a mixture of seasoned bread crumbs, and flour I had previously seasoned with Tony Chachere's Seasoning blend.


Step 4: Fry--I used an all-purpose vegetable oil, heated to medium high. Cook until the squash reaches the desired brown-ness--probably two minutes or so.  (You can see that mine varied a bit)


Step 5: Drain.  If I'm making a large quantity, I try to put them on something that I can slip into the oven between batches to keep them hot. We ate these almost as quick as I got them out of the oil, but I managed to keep enough around for supper!

Note: You can bread these with almost anything--flour, cornmeal, breadcrumbs, or a combination of all of the above.  Egg wash makes it stick a little more.  I like battered ones, as well, I just don't have a recipe handy for that since I prefer breaded.  (Plus it's easier!)

Just another day in southern fried paradise!

Until next time, good cooking, and good eating...

This post is linked to:
Meatless Monday at My Sweet and Savory
Slightly Indulgent Tuesday at Simply Sugar and Gluten Free
Tuesday Garden Party at An Oregon Cottage
In and Out of the Kitchen at Feeding Big
BBQ Block Party at Easy Life Meal and Party Planning
Sweet & Savory Saturday at Dessert Now, Dinner Later