Pages

Thursday, May 30, 2013

Glory Foods--Southern Taste with a Soulful Heritage

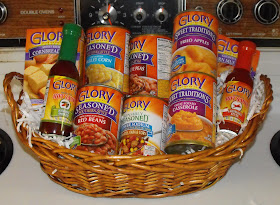
Not long ago I wrote a post about making crispy bits of delicious goodness from kale, and the kale that I used (and still buy when they have it) is the pre-prepared kale from Glory Foods.  So when I had an opportunity to receive from free food items and do a review of other Glory Foods products, I jumped at the chance. 

(Disclosure: Glory Foods provided me with the products pictured above, but the opinions expressed are my own and those of my family.)


And may I say that Glory Foods did not disappoint? They sent me this huge basket just stuffed with a variety of their canned and packaged products.


They even had another layer of big cans lined up behind the first row!

One of the things I noticed right off the bat is that they have more than one type of canned vegetables--they have the "Seasoned Southern Style", the "Sensibly Seasoned" and even "Sweet Traditions".  "Seasoned Southern Style", is just what is sounds like--old fashioned cooking the way our mothers and grandmothers did it, with plenty of spices and a bit of bacon to bring out the flavor.  "Sensibly Seasoned" is lower in sodium, and has no bacon, bacon fat, or meat flavorings in it. And of course "Sweet Traditions"--that's the sweet potato casserole and fried apples--I haven't tried them yet, but I plan on doing at least two more review posts on all of these yummy-sounding products.


So--"Seasoned Southern Style" vs "Sensibly Seasoned"--I got one kind of black-eyed peas in the basket, but I wanted to try them both, so I went out and bought an additional can, just so we could taste-test these side by side.


 I even cooked them side by side, with no additional seasoning or spices added.


 And even ate them side by side!

 Now, I have one family member that never ever ever eats pork of any kind, they ate only the "Sensibly Seasoned" kind, and gave them a thumbs up; my husband ate both, and liked the "Southern Style Seasoning" the best; and I ate both and actually preferred the "Sensibly Seasoned".


Along with the black-eyed peas, I tried two other Glory Foods products, but this time I combined them in one of my tried and true recipes. I used the Golden Sweet Corn Muffin Mix and the Cream Style Skillet Corn to make a delicious corn casserole.

Ingredients:
  • 1 box cornbread or corn muffin mix
  • 1 can cream style corn
  • 1 egg
  • 8 oz container of sour cream
  • half a stick of butter


Turn the oven to 350.  Place the butter in a 9 X 9 casserole. and put in the oven to melt and heat the casserole dish while the oven is heating. 

In a small mixing bowl, combine the corn, sour cream, and egg.  Add the corn muffin mix, and stir until well mixed.  Pour the batter into the melted butter in the casserole, and bake for about 30 minutes.

(One note: I was surprised that the "creamstyle" corn didn't look creamy in the can I had--it actually looked like whole kernel corn.  But I used it anyway, and the corn casserole was delcious, as always!)


I may have overcooked this one just a tad!

I served this, as you saw above, with hamburger steak and gravy, rice, and the black eyed peas, and it was a true Southern comfort food meal!

So far, we've been well pleased with all of the Glory Food products that we've tried.  As I use each of these other items, I'll be sure to let you know how they measure up, as well!

To see more about their product line, as well as other recipe and serving ideas, see the Glory Foods website.

Until next time, good cooking, and good eating!
This post is linked to:

Frugal Food Thursday at Frugal Follies
Fantastic Thursday at Five Little Chefs
Sunday, May 19, 2013

Pumpkin Cake Squares


Pumpkin Cake Squares

Besides church suppers, I think the next best place we southern gals get our quick and easy recipes is from our families--mothers, grandmothers, aunts, sisters, cousins, you name it.  You know how some people won't share their "special" recipe?  Not my family.  If one of us finds something yummy to make or eats something delicious, we share!  This recipe came about that way!  My aunt found it in her newspaper and tried it, then passed it along to my mom, who passed it along to me.

They both have "quick and easy" as their middle name in the kitchen, too!  A good, Southern tradition!

When I first heard of this, I thought it was like the pumpkin pie cake that I've posted on here several times before, but this one is totally different, but just as easy and just as good, if not better.

Ingredients:
  • 1 box yellow cake mix
  • 1/2 c + 2 T melted butter (separated)
  • 3 eggs
  • 1 15-oz can pumpkin
  • 2/3 c evaporated milk
  • 1/2 c + 2 T sugar (separated)
  • 2 t + 1 t cinnamon
  • whipped topping (optional)
Measure 1 cup cake mix, and set aside to use for the topping. 

Combine remaining cake mix with 1/2 c melted butter and 1 egg until crumbly. Press into a greased 9 x 13 inch baking pan.  Bake at 400 degrees for 10 minutes. Then turn the oven down to 350.

Meanwhile, mix pumpkin, 2 remaining eggs, 1/2 c sugar and 2 t cinnamon. Spoon mixture over the baked layer.

For topping: combine reserved 1 c of cake mix, 2 T melted butter, 2 T sugar, and remaining 1 t cinnamon in a small bowl.  Sprinkle the topping mix over the pumpkin mixture.

Bake at 350 degrees for 35 minutes

Allow to cool (yeah, right!), cut into squares, and serve with whipped topping.  (I think vanilla or cinnamon ice cream would be really good, too!

Until next time, good cooking, and good eating...

This post is linked to:

Meatless Monday at My Sweet and Savory
Church Supper at Everyday Mom's Meals
Sweet and Savory Sunday at Cookin' for the Seven Dwarfs
See Ya in the Gumbo at Ms enPlace
Foodie Friday at Rattlebridge Farm
The Weekend Re-Treat at the Best Blog Recipes

Saturday, May 18, 2013

Quick and Easy Ice Cream Cake


Here in the south, church dinners are a tried and true source of new recipes, and that's where I was first introduced to a version of this cold, creamy, and delicious semi-homemade ice cream cake.  This is one of those dishes that's made of such common-place ingredients, and is so easy to put together, it almost seems too good to be true.

But trust me, the result is so much greater than the sum of it's parts!


Ingredients: 
  • 2 boxes vanilla ice cream sandwiches (the ones with chocolate cookie outsides, vanilla insides)
  • 2 large or 3 small containers whipped topping
  • 1 small package instant chocolate pudding
  • 1 bottle chocolate fudge magic shell
  • chopped nuts


Step 1--Remove papers from 10-11 ice cream sandwiches, and place in the bottom of a 9 x 13 pan (or slightly larger--I usually have to squish the sides a little to make it fit.  


Step 2--Mix together chocolate pudding powder and 1 large or 1 1/2 small container of thawed whipped topping. (This works easier if you put it in a larger bowl instead of just mixing it in the whipped topping container.) 


The whipped topping will "deflate" just a bit, and the mixture will thicken to the texture of a sort of whipped chocolate mousse.


 Step 3--Spread "chocolate mousse" mixture over the layer of ice cream sandwiches


Step 4--Add another layer of ice cream sandwiches


Step 5--Add a layer of plain whipped topping.


Step 6--Drizzle liberally with magic shell, and sprinkle with chopped nuts.

And here is the hard part--cover and put in the freezer until frozen firm--I'd say at least 4 hours, but I usually make this the night before and freeze overnight to be sure.


This is a "sliceable" or "scoopable" dessert but I usually cut it into squares and serve it that way so that you can see the layers. 

When I first tasted of one of these at a church supper, and told my mother about it, she didn't think it sounded that good, because she doesn't really care for ice cream sandwiches that much. Once she tasted it though, she became as big a fan as I am, and she's already put her request in for one of these for her birthday in August.  That's why I surprised her with one early, for Mother's Day.  (Hence the "fine china" in the pictures above--who wants to wash dishes on Mother's Day?)

Variations and tips:

I haven't tried it yet, but I think this would be delicious using butterscotch pudding and caramel magic shell.
You can use chocolate or caramel ice cream syrup if you don't have magic shell.
Once it's frozen hard, I have packed these in an ice chest and transported them to a family pot-luck.


What summer goodies have you been gearing up to make this year?

Until next time, good (un)cooking, and good eating...

This post is linked to:
Sweet and Savory Saturdays at Dessert Now, Dinner Later
Saturday Night Special at Funky Junk Interiors
Saturday Show and Tell and Cheerios and Lattes
The Weekend Re-Treat at The Best Blog Recipes
Meatless Monday at My Sweet and Savory
Church Supper at Everyday Mom's Meals
Sweet and Savory Sunday at Cookin' for the Seven Dwarfs
See Ya in the Gumbo at Ms enPlace
Foodie Friday at Rattlebridge Farm
Sundae Scoop at I Heart Naptime
BBQ Block Party at Easy Life Meal and Party Planning

Saturday, May 11, 2013

No Cook Strawberry Freezer Jam


When I had the chance not long ago to buy a whole flat of these beautiful Louisiana strawberries, I had several things in mind, but the main two that I knew I wanted to make was the fresh strawberry pie that I shared last week, and as much strawberry freezer jam as I had berries to make.


I'm especially partial to freezer jam, in part I think because it's so easy to make, but also, since it isn't heat processed, when you thaw it and use it, it tastes just as fresh as the day you put it up.  When we were in Georgia, my husband picked buckets at a time of ripe blackberries that grew wild around his job site, and I made backberry freezer jam every year, as well as a couple of different kinds of blackberry pie.


My pectin product of choice is the Ball brand, for two reasons--one, it requires no cooking at all, and two, it uses more fruit and less sugar than some brands do for freezer jam.  You can buy it in envelopes or pouches, like I did when I made the blackberry jam, or in a little jar, like I used this time.


I had an especially hectic day the day I made this jam, and I had mixed results--mostly completely my fault, I'm convinced.  Here is the basic recipe, and I'll tell you what I did right, and what I did wrong.

Ingredients:
  • 1 2/3 c mashed strawberries (not completely crushed, you want more fruit than juice so that the jam will have some body)
  • 2/3 c sugar or Splenda
  • 4 T Ball fruit pectin (or one small envelope)
Mix the sugar (or Splenda) and the pectin together in a bowl.  Add the fruit, and stir for about 3 minutes, or until the sugar and pectin are well dissolved.  Pour into jars or containers, and allow to set for 30 minutes.  Because this is not heat processed, you can use regular glass canning jars, specially made freezer jam jars, or even repurposed plastic or glass containers of your choice.  Once it's set, store in the fridge for immediate use, or freeze for use later.

I made one small low-sugar batch, using Splenda, which set with no problem.

Then I made a larger, slightly-more-than-doubled batch, which didn't set.  When I realized that this batch wasn't working, I went back over my math to be sure I figured everything right.  Then I dumped the jars all back into my bowl and added a little more sugar and pectin and stirred it all up. 

Still nothing. 

The directions do say not to try to make more than 6 jars at a time, or it may not "set", but I don't think that was the issue.  I think the problem was, instead of mashing the berries in small batches, say a cup at a time, I put the last batch in my big bowl and just went to town with a potato masher.  By this time I had made pies, jam, cleaned the kitchen several times, put away my freezer beef delivery, etc, and I was tired, and trying to hurry the process.  So I mashed and mashed, and I think I mashed too much, so that I had too much juice and not enough actual fruit in the last batch. 


So, my final tally, is 2 2/3 jars of low sugar strawberry jam, and 6 1/2 jars of sweetened mashed strawberries, that when, thawed, make a delicious strawberry syrup to pour over ice cream, or maybe even mix with pound cake and cool whip for a really juicy strawberry shortcake.  Or mix into cake and frosting to make a delcious strawberry cake.

At any rate, it will be eaten in some form or the other, and I have to say, it's not bad as peanut butter and jam, as long as you mix it into the peanut butter and not try to just spread it on the bread. 

I've had too much success with freezer jam to let this be a discouragement (although, I have to admit, I was pretty discouraged the day I made this!)

What success and failure have you had in the kitchen lately?

Until next time, good (no-cook) cooking, and good eating...

This post linked to:
Meatless Monday at My Sweet and Savory
Church Supper at Everyday Mom's Meals
Sweet and Savory Sunday at Cookin' for the Seven Dwarfs
Make, Bake, Create at Hope in Every Season
Back for Seconds

Saturday, May 4, 2013

Fresh and Easy Strawberry Pie


When I first moved back home to Louisiana a few years ago, I really missed not having more noticiablly different seasons. In Louisiana, we have a short fall, 5 minutes of winter, and 9 months of summer. And in between winter and summer, we have spring. Strawberry weather.  


Yes, while most of you are still struggling with frost and cold and even snow this late spring, we have folks sitting on the side of the road selling beautiful flats of Louisiana strawberries.  Sometimes from Hammond, sometimes from Ponchitoula, sometimes one of the other little towns in the top of the toe; what's commonly known as the northlake area, that little stretch of strawberry heaven along Interstate 12 north of Lake Pontchartrain. I don't know what it is about that area of the state, whether it's the soil or the weather, or something completely different, but they grow the best strawberries. 

I like strawberries almost every way you can eat them.  I like them so much I'll even slice some up and eat them with milk and sugar, like a bowl of cereal.  Or cream instead of milk, if I have it.  Even what we in the south euphemistically call "canned cream", which is nothing more than evaporated milk, poured straight over a warm cobbler or a cool bowl or fruit.  Yum. 

But by far my favorite thing to do when I have really good strawberries is make a fresh strawberry pie

Years ago when I worked at one of our local banks, one of our customers always brought a truckload of strawberries back from southeast Louisiana and sold them to his friends and neighbors, and he generously gave every employee of our bank a whole flat of strawberries. (There are definite advantages to living in a small southern town.)  The first time I got strawberries-by-the-flat after I was married, my husband said "Oh, good, strawberry pie!" I had an immediate vision of a cooked, two-crust pie, like apple pie or cherry pie, and turned up my nose, but he had something else in mind.  "My favorite!" he said, and tried to describe it, so as a dutiful wife, I started looking for recipes in my cookbooks.(Remember those? Where we used to find recipes before the internet!). 

I found several versions, and narrowed them down by practical, everyday ingredients and ease of application, and this is my tried-and-true version that I've used for years. It uses a combination of a cooked glaze and strawberry gelatin, but it uses less gelatin than many recipes, making a softer setting, fresher tasting glaze than some versions of this pie that I've eaten.


Ingredients:
  • 1 c sugar
  • 1 c water
  • 4 T flour
  • 4 T strawberry gelatin (that's half of a small box--this is easily doubled, I usually make these two at a time, using 2 c sugar, 2 c water, 1/2 c flour and the whole box of gelatin
  • 1 pint (approximately) strawberries
  • single pie crust (or two crusts if making two)


Step 1: pre-bake your pie crust, and allow to cool

You can make your own if you have time, or use a frozen pie crust.  If I don't make my own (which, honestly, I hardly ever do, I prefer the refrigerated roll out crusts.)  Be sure to pinch the edges and prick the bottom and sides. I baked this one at 375 for about 10-12 minutes.


Step 2: While your crust is baking and/or cooling,wash and hull your strawberries


Step 3: Stir together sugar, flour, and water and cook over medium high heat, stirring constantly while the sugar and flour dissolve, then regularly until the mixture comes to a boil and begins to thicken.  Allow to cook for another minute or so, stirring constantly again.


Step 4: Remove from heat and stir in gelatin, stirring to dissolve


Step 5:  Allow glaze to cool


Step 6: Spread a small amount of cooled glaze on the bottom of the pie


Step 7: Slice strawberries and layer in the pie shell.  Be generous, but don't overfill, or the glaze won't cover all of the berries, and the pie, while it'll still taste good, will be ugly.  Don't ask me how I know this.


Step 8: Pour the remaining glaze over the top of the berries.  Refrigerate and allow to "set", at least 30 minutes.  If it's a little soft, oh well, that's the price you pay for cutting it too soon.  Don't ask me how I know this, either. 


Step 9: Add whipped topping, either the real thing or the fake stuff that most of us still use, although we feel really really guilty about that.

If I'm serving this at home to family, I usually leave the topping off and add a big dollop to the top of each piece of pie as it's served.  If I'm making this for an occasion, I add a big dollop to the middle, so that when I bring it out everyone will ohh and ahh over it, or I spread it out all over.  

I love this pie.  Really. 

Tip: You can use 3 T of cornstarch instead of 4 T flour if you want a clearer glaze. Flour makes it a bit more cloudy, but I first started making it with flour because in my newly-wed kitchen it was what I had. 

Until next time, good cooking, and good eating!

This post is linked to:
Foodie Friday at Rattlebridge Farm
Friday Favorites at Simply Sweet Home
Foodtastic Friday at Not Your Ordinary Recipes
Saturday Night Special at Funky Junk Interiors
Weekend Wrap-up Party at Tater Tots and Jello
Church Supper at Everyday Mom's Meals
Share Your Creativity at It's Overflowing
Sweet and Savory Sunday at Cooking for the Seven Dwarfs
Meatless Monday at My Sweet and Savory