Sunday, December 30, 2012

Sweet'N Low


As part of the DailyBuzz Food Tastemaker program, I've had an opportunity to try out Sweet'N Low zero calorie sweetener to make some of their signature drinks and beverages, or to come up with some of my own.  This is perfect timing for the ending of this season of overindulgence, to help us get back on track with lower sugar and calorie intake.


As part of the program I received this cute cocktail shaker, some recipe cards, and some packets of Sweet'N Low to try.  As a teetotaler, I wasn't so much interested in the cocktail recipes, but I figured I could have some fun with the shaker on some iced drinks.(I found out I loved the aluminum shaker, it makes things really cold, really fast.  But I digress...)

The first thing I tried to make was hot chocolate. And "tried" was the operative word!  I love hot chocolate, but my favorite versions are full of sugar, and some of the commercial "diet" or "sugar-free" versions taste bland and uninteresting.  So, using a recipe from the cocoa tin and substituting equivalent Sweet'N Low for the sugar, I made my first cup.  Yuck.  Way too bitter. That amount of unsweetened cocoa was just too much. But I tried again, several times.  One time too bitter, one time too bland--until I think I have it just about right. 

Ingredients
  • 8 oz milk
  • 2 t unsweetened cocoa
  • dash of salt
  • 1/4 t vanilla
  • 2 packets of Sweet'N Low (sweeteners equivalent of 4 t sugar)
  • dollop of half & half
Microwave the milk for about two minutes.  (I have an ancient microwave, so it may take less time in a newer model.) Meanwhile, mix the cocoa, Sweet'N Low, and salt in the bottom of your cup or mug.  Add the hot milk, and stir until the cocoa dissolves.  Add the vanilla and a dash or dollop of half & half.   


I wanted to float some mini marshmallows on top, but I refrained.  You may want your hot chocolate slightly stronger, but the secrets seems to be, twice as much equivalence of sweetener as you have cocoa.  Does that make sense?  Each packet of sweetener is the equivalent of 2 teaspoons of sugar, so 2 packets = 4 t sugar, use with only 2 t cocoa.


Here in the south, we may have highs in the 30's or 40's today, and temperatures in the 70's the next, so one afternoon I decided to try something cool. I have a friend who has a lemon tree in her yard, and I have an abundance of lemons, so lemonade seemed like the perfect choice.  I squeezed a couple of lemons, and again, experimented with quantities of lemon juice and sweetener.  This time I used the cocktail shaker to mix everything over ice, and that's when I discovered the cooling qualities of the aluminum shaker!  The basic recipe I started with was a tablespoon of lemon juice and a tablespoon of sweetener to 8 ozs of water, but I found this tasteless.  When I want lemonade, I want some pucker power--and a balance of sweetness, too!  I found a recipe on the Sweet'N Low site for a lemonade that uses a combination of liquid Sweet'N Low and sugar, but all I had to work with was the packets.  What I finally came up with was:
  • 1/4 c lemon juice (4T)
  • 3 packets Sweet'N Low (= 2T)
  • about 10-12 oz water
Put everything into a cocktail shaker, including ice, and shake until blended.  This one I liked--it was sweet enough, and strong enough of lemon, too.  I'm sure every lemon has a differing amount of "pucker", so this is one thing that you definitely need to taste test. 


If you'd like to see more drinks, including some "real" cocktails, along with other items, made with Sweet'N Low zero calorie sweetener, see www.sweetnlow.com/recipes the recipe section of their website. You can also access a coupon to sweeten the deal. 

I remember these "little pink packets" from the days when they were just about the only low- or no-calorie sweetener around.  And while I hadn't used it in a long time, I've already gone out a bought a box of packets, and will definitely be using Sweet'N Low again.

This is a sponsored post, but the review and opinions are those of my own. 

Until next time, good (un) cooking, and good eating (and drinking)...


Wednesday, December 19, 2012

Last Minute--Gifts From the Kitchen

It wouldn't be December without me doing a quick recap of some of my favorite goodies to "gift" for the holidays. 

There are lots of delicious goodies out there, but not all of them are suitable for "gifting".  You need to have something that's not too gooey or sticky, is easily packaged, and has a decent "shelf-life" without refrigeration or specialty care.  The items I'm linking to below fit all of these criteria, with the added benefit of being quick and easy (my middle name in the kitchen) to make and take. 


First up are these cute jar mixes.  These are easy to make, easy to take, and easy to dress up with a little Christmas fabric or even wrapping paper, and ribbon.  You can give these individually, or add them to a cute gift basket of kitchen-y items, from dishtowels to gadgets.   


Next up on my list are one of my favorites--coconut macaroons. These are easy to make, smell divine both raw and while baking, and fit that "gift-y" criteria of being easy to package and to keep.  You can leave these plain, or dress them up by adding mini-chocolate chips, or dunk them in what I call "dipping chocolate" and rolling in holiday sprinkles. 


A quintessential goodie for Christmas is luscious, creamy fudge, and this microwave version is super easy to make. The main ingredient is this one is semi-sweet chocolate chips, but you could make variations by changing the flavor of chips--try milk chocolate, white chocolate, or even peanut butter chips for a variety of tastes. 


And last but certainly not least in this installment of gifts from the kitchen, is my absolute very favorite fudge--made in the microwave, it's less creamy, with a firmer, slightly grainy texture that reminds me of the old-fashioned stove-top cooked fudge of my childhood.  You know the kind--sometimes it seemed like it was never going to set up.  As a matter of fact, I remember my sister getting tired of stirring and pouring some into a buttered pan, and I remember my mom and I finally scraping it back into the pot and cooking it a little more when it never got beyond the "chocolate soup" stage.  This one is fairly fool-proof, I think, at least I've never had it not set up for me!

What goodies are you making and taking this holiday season? 

This post is linked to:

Works for Me Wednesday at We are THAT Family
Delicious Dishes at It's a Blog Party
Tempt My Tummy Tuesday at Blessed with Grace

Until next time, good cooking, good eating--and good gifting!

Sunday, November 11, 2012

Fall Favorites--2012

I know I haven't been blogging lately about what I've been cooking, partly because I've been in a rut about my cooking for a while now, and I not only haven't made anything new in a while, what I have been making has been a little, ahem, sub-par at times.  I'm trying to get back on the band wagon though!  And so I thought I'd share just a bit of what I have been making:


My original post on this pie was titled, You'll Never Guess What's in This Pie, and rightly so.  But fall is not complete with the smell of this yummy pie, made with--wait for it--navy beans!  It's a light, delicious sweet pie with all of the smells of fall spices, and while you'd never guess what's in it, you'll be glad you tried it. 


Lately I've made Stove-Top Barbecue Chicken at least once a week--what can I say, I've been in a rut--but I still don't think I'll cross this off my list, it's too easy to make, and statisfyingly good.


And last but not least, since my son & I are both trying to watch our sugar intake, I made our favorite version of this crustless Sugar Free Cheesecake.

What good things have you been cooking lately?

Until next time, good cooking, and good eating...

Saturday, October 20, 2012

Review--Progresso Recipe Starters Cooking Sauce


Have any of you had a chance to try any of the new Progesso Recipe Starters Cooing Sauces?  I had an opportunity through MyBlogSpark to try all five of their new sauces.  They even sent me a gift card to buy additional ingredients, the cute wooden spoon pictured above, and a little recipe booklet with a fairly quick and easy recipe using each of the sauces.

Since "quick and easy" is my middle name in the kitchen, the concept of having a sauce pre-made and seasoned and ready-to-go really appealed to me.  The results, for us, were a little bit mixed. 


The first recipe I tried was the creamy lemon chicken, made with the Creamy Roasted Garlic cooking sauce.  I wanted to like this so much that I actually went out and bought another can of this sauce and tried it again.  Maybe I seasoned my chicken too much, or added too much lemon juice, but we found this a little salty and just okay tasting. 


The second one, I wanted to try was the pulled chicken made with the Fire Roasted Tomato cooking sauce.  For this recipe, you basically add sugar, worchestershire sauce and seasonings to this canned sauce to turn it into a barbecue sauce to add to pre-cooked chicken.  I honestly couldn't see the point in this one, because it would be quicker and easier to just use a bottle of good quality barbecue sauce.  I make a killer oven or stove-topped barbecue chicken with bottled sauce and few extra dashes of this and that, so I probably wouldn't bother with this one.  I would use the sauce, but would be more likely to use it in a pot of chili or taco soup, or spaghetti sauce.--maybe even in lasagna. 


The recipe that was recommended with the Creamy Three Cheese cooking sauce was more of the same--use their sauce as a base, add milk and seasonings and cheese--if I'm going to be heating milk and adding cheese, I'm making a cheese sauce--what do I need theirs for?  What did work for us for this one was ignoring the suggested recipe and using it "straight" on some pasta to make a basic mac & cheese.  My son voted a thumbs up on the simple version.


But I'm saving the good news for last--the Creamy Parmesan Basil--this was by far our favorite.  It's a truly stand-alone sauce, good over almost any kind of pasta by itself, and also as recipe base for chicken alfredo, pasta bake, or white chicken pizza, just to name a few.  I bought this one to try again, too, and I'll definitely be adding it to my grocery list again. 

Final result--I can heartily recommend the Creamy Parmesan Basil, as well as the Creamy Three Cheese.  The others I would try again, but probably with a different recipe--speaking of which, you can find all of the recipes I got in my little booklet, as well as many alternative ones to try, at the Progresso website.  There are also come coupons available right now, both for Recipe Starters sauce, and for the Progresso Light soups. 


Disclosure: The information, products and ProgressoTM Recipe StartersTM gift pack was provided by Progresso through MyBlogSpark.


Sunday, August 26, 2012

Coupon Alert--Pillsbury Baguette Chips


Hey everybody!  As part a member of MyBlogspark, I've received a link for myself and for my readers for a coupon from Pillsbury for $.75 off Pillsbury Baguette Chips.  These are slices of toasted, flavored baked bread, that can be eaten alone or topped with other goodies--even crumbled up to add some crunch to a salad.  Just click the highlighted link above, print, and shop!

Thanks to Pillsbury and MyBlogSpark for the information and coupon offer!

Wednesday, June 20, 2012

eFoodsDirect Product Review


I was recently contacted by a company called "efoods Direct" and asked to review some of their products, as well as offer my readers a chance to try meals at a reduced price. 

eFoods Direct is a company that sells packaged dried foods and meals suitable for long-term storage, as well as for use while hiking and camping.   There are a lot of reasons to store food, including disaster preparedness--one that hits close to home for me, since I live in a hurricane prone area, and have personally gone through a hurricane, and what's worse, in many cases, the aftermath. Having some of these easy-to-prepare (in most cases, stir into boiling water, cook the recommended time, season, if necessary, and serve) would have been a real blessing while we had gas and food lines for weeks.  There were some things that were just not available afterwards, and some of our stores didn't re-open for weeks and even months later. 

I was given and opportunity to try three different products, the cheesy chicken and rice, tortilla soup and creamy potato soup.


The first meal that I tried was the "Cheesy Chicken & Rice" which I was hesitant to try at first, after looking at the list of ingredients and not finding 'chicken' anywhere on the list.  There is no 'chicken' in the "Cheesy Chicken & Rice"; there is, however, texturized vegetable protein that looks and tastes remarkable like chicken.  This was actually very good.  It was creamy, it was cheesy, and it tasted chicken-y.  It got two thumbs up, from my son and from me.  All it needed was a little black pepper. 


The tortilla soup was the next product I tried.  I have to admit, it looked awful in the pot, sort of gray and unappetizing.  When it was ready, though, you could see the seasoning and bits of vegetables in it. This was not our favorite, but it was quick and easy and tasted.  It wasn't a thumbs up, but it wasn't a thumbs down either.  It was okay, I could eat it again, but I probably wouldn't order it in a restaurant. I have to admit, though, that I'm not really wild about most things that have a "southwest" seasoning flair--some kind of seasoning is just not to my taste. 


It was better with just a little cheese added to the bowl.


And last, but not least, was the Creamy Potato Soup.  I loved this--so easy, and delicious. 


I added salt & pepper to taste, as the directions on the package tell you to do, and then a little cheese, just for good measure--this one was good without the cheese, too, though it added just a little something extra.  I could easily see adding some corn and chicken to this to make a quick-and-easy chicken corn chowder.  This one is definitely thumbs up. 

All three of these meals were easy to make--boil water, stir in, cook the required time.  The creamy chicken & rice mentioned adding a couple of tablespoons of butter, which I did.  I think all of them say to add salt & pepper to taste, which I did to the potato soup, but the rice needed only a little black pepper.  All three of these meals were kosher, all had an extremely long shelf-life (like 25 years long--I have to admit, I've thrown away my share of bargain stock-pile items that I "lost" in the back of the pantry and found only after they were well-expired--something I wouldn't have to worry about with these products!) efoodsDirect prides themselves on using only the best of ingredients, so that the end product is the very best it could be. 

I would definitely try the two I really liked again.  They would make excellent additions to your long-term food storage, whether for disaster or economic downturn preparedness, and I think they'd be wonderful on a camping trip--light to carry, easy to prepare. 

Right now, efoodsDirect is offering a couple of special discount deals, which you can see at efoodsDirect offer.  They include special coupon codes giving you 40-50% off of specified packages, as well as a free trial offer where all you pay is shipping and handling to receive the same three meals to try that I did.  (If you choose the percent-off deals, be sure to use the coupon codes to receive the discount at check-out!)

(Disclosure: I received free products, but no other compensation for doing this review.  The opinions expressed are my own.)

Sunday, June 3, 2012

Bread Machine Challah


 I know that it's been awhile since I did anything new and different in the kitchen when I stop what I'm doing and run around the house trying to find my camera and making sure the batteries in it are good!

Challah is one of those breads that just seems mysterious and difficult to make--but after I made three different batches with the help of my bread machine this week, I found out that it's really not that hard--at least not once I made up my mind to to get a little messy with the flour! That was the fun part!

The first part is no different from making any bread machine bread--but in this case I used the "dough" feature which mixes and kneads and rises, but doesn't cook the bread.

I made a 1 1/2 pound loaf size--the first time I made one big loaf, but the other two times I divided the dough and made two smaller loaves per recipe.

Here are the basics of Bread Machine Challah:

Ingredients:
  • 3/4 c warm (not hot)water
  • 3 c bread flour
  • 2 T sugar
  • 1 1/2 t salt
  • 1/2 c butter, diced
  • 2 eggs
  • 1 egg yolk
  • 1 1/4 t fast rise bread machine yeast
Load the ingredients in the order listed, making sure to push the flour into the corners of the breach machine pan to keep the water from seeping up.  Place the other ingredients in the corners and around the edges, then make a little well in the middle for the yeast.  (This is especially important if you're using the delay feature, which really isn't a good move for this bread, since it uses fresh raw eggs--not one you'd want to use your "time" feature the be ready in the evening when you come home from work!)

Seat your pan in your machine, select the "dough feature".  You may want to check it after a few minutes and be sure that the knead bar is attached correctly and everything is starting to mix.  After that--leave it alone until it's finished--mine takes an hour and half.


This is what it looks like when it comes out of the machine at the end of the "dough" cycle-- a little bit puffy, and smooth on top.  Turn it out onto a well-floured surface, because...


...it may be sticky underneath!


Punch it down and work just enough flour around the outside so that it isn't sticky any more.


Divide the dough in half to make two loaves.  (The first time I made this, I did only one big loaf, but the tradition for Shabbat and holidays is to have two, so the next two times I made two smaller loaves).

Divide each portion into fourths, and shape into four long ropes of dough.  I think these were maybe 8-9 inches long.  And now the fun part--braiding them together!


This was my first effort at a 4-rope braid.  Be sure to tuck the ends in well, if not, they may come undone during the rise or baking.


This was my second loaf--I still need to practice those ends!


Place on a well greased or cooking sprayed baking pan...


...then cover with greased or cooking-sprayed cling wrap.  Put it in a warm place, away from drafts, to rise...


...I use my oven, with just the oven light turned on.  If it's really cold, you might want to turn you oven on at the lowest setting for just a couple of minutes.  Then turn it off and put your bread dough to rise, until doubled in size, or about an hour.


Remove from the oven, take the cling wrap off, and it should like the one in front.  I made the mistake of trying the shift the position of the back one on the baking it sheet, and it sort of deflated.


Bake at 350-375 for 20-25 minutes...and you'll have a beautiful, crusty loaf of Challah!


These were the next two I made---I didn't make the mistake of touching them again, but somehow I just can't seem to get two "pretty" ones out of the same batch.


They looked good enough to eat, though! (and photograph!)


Remove to a rack and allow to cool--if you can stand it--or tear right into one of them--after all, the gal who cooks the bread gets to taste first--at least in my book!

This made a delicious bread with a firm, crusty outside--I'm determined to perfect that braiding technique so they'll look a bit more uniformly "pretty" but "good enough to eat" suits me just fine, too!

This recipe is linked to:

Meatless Monday at My Sweet and Savory
Tasty Tuesday at Balancing Beauty and Bedlam
Tuesdays at the Table at All the Small Stuff
Tempt My Tummy Tuesday at Blessed by Grace
Delicious Dishes at It's a Blog Party
Bring it with Bizzy at Bizzy Bakes
What new recipe have you tried lately?


New Look

How do you like my new look?

I've been wanting a new look for a long time, and recently started playing around with some different blogger templates, but I'm such a scaredy-cat, plus I waffle back-and-forth so much that always just went back to my original look---until this time. 

Something about this one I like.  So here it is--my new look--at least for now.

Coming this week, I have:
  • some pictures and a recipe for a beautiful loaf of Challah (bread), made simple by using a bread machine to make the dough.
  • also a review of some freeze-dried soups and an entree from eFoodsDirect, a line of freeze dried products available for use for long-term storage, camping, disaster planning, etc.
So, what's been cooking in your kitchen?

Tuesday, May 15, 2012

Coupon Alert--Ocean Spray® Fruit Flavored Snacks

MyBlogSpark and Ocean Spray have sent me coupon offer for $1.10 off two boxes of Ocean Spray Fruit Flavored Snacks, which I'm allowed to share with my readers.  These fruit snacks are made with fruit juice, and although they aren't designed to replace fruit in your diet, they make a good snack alternative to candy for you or for your kids.

Click on the link highlight above and print your coupon-courtesy of MyBlogSpark and Ocean Spray.

Disclosure--I have received no compensation for sharing this link.

Monday, May 14, 2012

My Ode to Butter

"Is there anything better than butter?"

That's my favorite line from one of my favorite movies--Julie & Julia--about the food blogger(Julie) who cooked and blogged her way through her foodie idol's (Julia Child) cookbook, blogging all the while. 

I have to say, one the best discoveries I've made in recent years is how delicious (and actually healthy) "real" butter is.  You see, I was a margarine gal my whole life.  I mean, we used to say "butter"--as in "put the butter on the table" or "get stick of butter out the fridge", but what we actually used was margarine--whether in stick or tub, hard or soft, it was margarine. 

But in recent years, whether as a result of the back to nature/green/whole foods/real food movement, or the discovery that real food without all of the chemicals and preservatives was healthier for us, or just the acknowledgement, as I tried to learn to cook more from scratch, that butter and things made with butter just taste better than those made with margarine, my husband and I use a lot more butter these days than we used to. 

The only drawback, if you could call it that, to using butter instead of tub margarine or spread, whatever that is, is that you have to remember to put the butter out to soften before you can use it on toast, or rolls, or even just good bread-and-butter at dinner.  And I never remember.  I've tried some of the "spreadable butter" products, whipped butter, and even just popping it into the microwave, but it either doesn't spread right, or it ends up melted instead of softened.  Years ago when I visited my mother-in-law in the mountains of northern California for the first time, she just kept a stick of regular "hard" margarine or butter on a saucer in one of her kitchen cabinets--soft, room-temperature butter or margarine at all times.  Unfortunately, here is the heat and humidity of the Deep South, if I did that, I would open my cabinet door to a puddle of melted butter, full of ants or worse, and probably with a coating of green, purple, and black fuzz, to boot. 

So I very interested to read about The Original Butterbell Crock by L.Tremain .  It promises to "Keep Your Butter Fresh Delicious and Spreadable for up to 30 days...without refrigeration!" 

As a family run business, they're looking to increase familiarilty and awareness of their products.  If you're on facebook, visit their facebook page...


And if this looks like a product you'd like to try, for the next two days they have a special buy-2-get-1-free deal going on.


I'm thinking I'd like to try one of these myself!

So how about it? Are you a butter convert like me, or is margarine still your spread of choice?

Until next time, good cooking, and good eating!


This is a sponsored post, brought to you by The Butter Bell Crock, who has partnered with 
FoodieBlogroll.


Wednesday, March 7, 2012

My Quick and Easy Hamantaschen

Tonight at sundown marks the beginning of the Purim, or the Feast of Esther--the celebration of the deliverance of Israel from the hand of the enemy as told in the book of Esther. I thought I'd share this quick and easy version of hamentaschen, or Haman's hats, that I came up with a few years ago. (hiss, hiss, stomp, clap) (In order to obliviate the very name of Haman, who schemed to destroy God's people, when the story of Esther is read or told, the audience must hiss or stomp or use noisemakers anytime his name is mentioned--thus the "hiss, hiss, stomp, clap"!)


Ingredients:


  • pie crust--for this I want a smooth, even crust, so I use my old faithful ready-made crusts


  • pie filling of your choice--I like cinnamon spice apple, or blueberry


  • powdered sugar to sift over the finished product


You need a pie filling with small "bits", so when I do this with apple filling, I use my pastry cutter to smash the pieces so that I have smaller pieces of fruit.


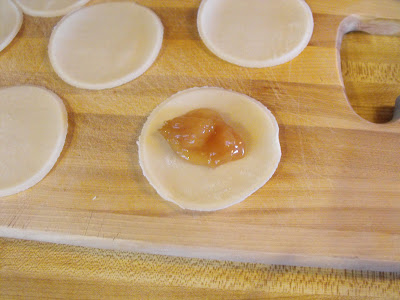
Use a biscuit cutter or the top of a glass to cut as many circles as you can get from your pie crust. You can take the bits that are left and re-roll and cut again, if you like.


Place a small amount of the filling on each circle--I used a heaping tablespoon, and almost overfilled some of mine.


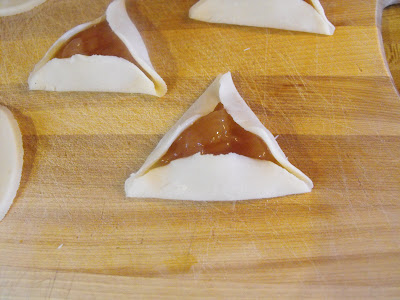
Fold the sides up into the traditional three-cornered hat shape.


It's been a couple of years since I made these, and the first batch I did started coming apart at the corners when they started baking, so I really pinched the corners together on the next batch. I had a reader leave a comment on my previous post about hamantaschen, suggesting using an egg wash to make the corners stick--I haven't tried it yet, but it makes sense to me!


Bake at 400-450 degrees for 15-20 minutes. Remove from the baking sheet to a cooling tray. (This was the first batch--see how they started coming apart? Still tasted good, though!)


Dust with powdered sugar right before serving.


These are so good--I'm not usually a big fan of fruit pies, especially apple, but these just the right proportion of crust to filling--and big dollop of whipped cream on top doesn't hurt any, either! (I suspect they would be good with a scoop of vanilla ice cream, too, but they never seem to last long enough for me to get to try that.)


Until next time, good cooking, and good eating!


This post is linked to:


Delicious Dishes at It's a Blog Party


Tasty Tuesday at Balancing Beauty and Bedlam