Wednesday, May 18, 2011

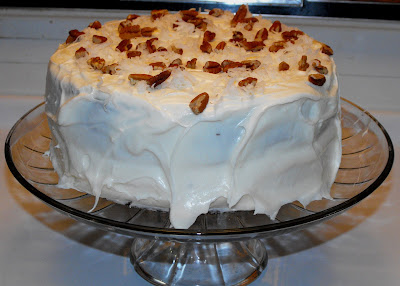
Italian Cream Cake

There's a thrift store in our little town that holds a bake sale on the first full weekend of the month, run by the ladies from the local Mennonite church. They always have such good things--pies, cakes, and cookies, along with breads and even homemade freezer meals. One of our favorites was always an Italian Cream cake, but as with lots of other things in this economy, the bake sale items have just about priced themselves out of my comfort zone. So I decided to try my hand at baking one of these luscious goodies myself.

The recipes I found all called for egg yolks in the main batter, then beating the whites separately and folding in. Since "quick and easy" is my middle name in the kitchen, I am not much of a multi-step, multi-bowl baker. Recipes that call for beating the egg whites and folding them in seem scary and overly complicated, so I just kept on looking until I found that called for whole eggs just plopped in the batter like the regular cake recipes I am used to making.


Italian Cream Cake

Ingredients:


  • 1 c buttermilk


  • 1 t baking soda


  • 1/2 c (1 stick) butter, softened


  • 1/2 c shortening


  • 2 c sugar


  • 5 eggs


  • 1 t vanilla


  • 1 t baking powder


  • 2 c all purpose flour


  • 1 c coconut


  • 1/2 c chopped nuts


  1. Dissolve baking soda in buttermilk and set aside


  2. Cream together butter, shortening, and sugar until light and fluffy


  3. Add vanilla and eggs--1 or 2 at a time, mixing well in between.


  4. Add buttermilk, flour, baking powder, and coconut, until combined


  5. Stir in nuts


  6. Pour into greased cake pan(s). I used two 8 or 9 inch rounds.


  7. Bake in a preheated 350 degree oven, 30-35 minutes (if you use a tube pan, it will take longer) or until a toothpick inserted in the middle comes out clean


Allow to cool completely before frosting


Cream Cheese Frosting


Ingredients:


  • 8 oz cream cheese, softened


  • 1/2 c butter, softened


  • 1 t vanilla


  • 4 c powdered sugar


  • 2-4 T cream or milk


  • 1/2 to 1 c coconut


  • 1/4 to 1/2 c chopped nuts


  1. Cream together cream cheese, butter, and vanilla


  2. Add powdered sugar and mix well, adding cream or milk as needed for desired consistency.


  3. You can add coconut and nuts into the frosting if like, or sprinkle on top like I did


I almost messed up by thinning my frosting just a bit too much--I usually make sheet cakes, that don't even come out of the pan, or tube cakes, where a softer frosting is better, to drip over the sides. This time, though, I wanted a nicer presentation in the form of a layer cake, and when I made a soft frosting, as usual, I had a little trouble trying to keep it from sliding off the sides. Next time I do a layer cake, I'll remember to make the frosting a little stiffer.
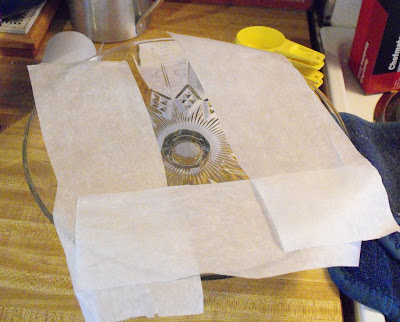


Since I was trying to make a pretty cake, as well as a delicious one, I wanted to use my pedestal cake platter. To keep the plate or platter clean while you're frosting the cake, put down a layer of strips or parchment or wax paper.


Then put the first layer on top of the paper strips. Make sure you have enough sticking out from under so that you can pull them out afterwards.

Frost the cake as usual, then sl-o-o-o-o-w-ly pull the paper strips out from under the edges.

I was so impressed with myself for making this cake--completely from scratch, and a layer cake, at that! Maybe I'll change my middle name from "quick and easy" to "made from scratch"!

Until next time, good cooking, and good eating!


This post is linked to:


What's on the Menu Wednesday at Dinning with Debbie
What's Cooking Wednesday at the King's Court IV
Delicious Dishes at It's a Blog Party
Recipe Swap Thursday at Prairie Story
Tasty Traditions at Coupon Cookin'
Try New Adventures Thursday at Alicia's Homemaking
Foodie Friday at Designs by Gollum
Sweet Tooth Friday at Alli N Son
Friday Potluck at EKat's Kitchen
Sweet Indulgences Sunday at a Well Seasoned Life

Friday, May 6, 2011

Hamburger Steak and Semi-Homemade Comfort Food

In case you haven't noticed, I've been in a food rut for weeks now. Not only have I not blogged about food, I've barely cooked. I find myself home alone several nights a week, and I end up doing what I call "scrounging"--eating anything I can "scrounge" up without doing any major cooking--sandwiches, cheese and crackers, soup, even (yes!) milk and cookies. But I'm running out of "scrounging" ideas, and I know I need to eat better. So one night this week when my son came home early and unexpectedly, I decided to make us a simple, semi-homemade dinner of pure comfort food. Hamburger steak is one of his favorites, and I'm a rice-and-gravy gal from way back (waaaaay back--even as a kid I loved rice and gravy, any time, any place.)

First up was the hamburger steak. I'm blessed to have home-grown, farm raised beef in my freezer from my mom and dad's cows, so I started with a pound of extremely lean beef. This stuff is so lean that when you cook it "loose", you usually don't even have to drain the grease off of it. That's lean.

Ingredients:


  • 1 lb lean ground beef

  • dried onion flakes (about a tablespoon)

  • 2 or 3 splashes of Worchestershire sauce

  • Tony Chachere's Creole Seasoning, or your all-purpose seasoning blend of choice

Sorry I don't have exact proportions, it all depends on your family's taste. I want mine to be pretty well seasoned. Mix everything in well, so that the seasoning is blended throughout the meat. The best way to do this is with your hands! Divide the meat up into however many portions you want to make. At this point, I always form the meat into a ball and pat it back and forth in my hands and kind of pack it so that it will hold together well. I do this when I'm making hamburgers, hamburger steaks, meatballs, or whatever. Then I squish it start forming it into the shape I want. For some reason, when I do hamburger steak, I make the patties big and sort of oval. I smooth the edges and re-pat so that little pieces of meat won't break off while it's cooking. Once you're done and have your hands clean, put a straight sided frying pan on the burner to heat, starting off on medium-to-medium-high heat. Since I was cooking with such lean meat, I added a little bit of cooking oil to my frying pan to keep it from sticking--if I was using bought ground meat, it usually has enough fat in it to skip the oil. Once the pan is hot, I add the meat. After a few minutes, check to see if the bottom is lightly browned, and turn so that the other side can brown.


While I was waiting for the meat to brown, I got the rice started, 1 cup of rice, 2 cups of water, bring to a boil, then cover and turn to simmer. It takes about 15-20 minutes for the water to absorb. You can salt the water if you want, sometimes I do, sometimes I don't.


Check the meat, and once both sides are browned a little, cover and turn the heat down to low-medium.


Meanwhile, I measured water and started it boiling to make my gravy. Yes, I used a brown gravy packet--that's what makes this semi-homemade! Not just any brown gravy, but Southeastern Mills. They make the best gravy mix--I like their brown gravy and their beef gravy, which is harder to find.


Once I got the gravy made, I poured it over the meat in the frying pan, covered it, and turned the heat to about 3 (out of 10) on my knob--low medium, I'd say. I wanted the gravy to simmer, the meat to continue to cook, but nothing to scortch.


And then on the the next semi-homemade part of my meal--frozen steam-in-the-bag-in-the-microwave veggies. My son and I both love this particular one--Bird's Eye Steamfresh Vegtables--the one with aspargus, white and yellow corn, and baby carrots. Love, love, love this one. All I did was cook according to package directions, pour into a serving dish, add a sprinkle of salt and couple of dabs of butter, then stir.


And there we had it--a plate of comfort food, semi-homemade, done in about about 30-40 minutes, start to finish.


I felt like I'd made a gourmet meal!


My hubby will be home next week, so I'm gearing up to get back into my cooking mode.


Until next time, good cooking, and good eating!


This post is linked to:

Foodie Friday at Designs by Gollum

Recipe Swap at the Grocery Cart Challenge

Recipe Linky at MomTrends


(Disclosure--I haven't been paid or compensated in any way by Bird's Eye or Southeastern Mills. These are just two products that I've tried on my own and like.)