Thursday, March 17, 2011

Green Fluff for St Patrick's Day

In honor of St Patrick's Day, I'm repeating this recipe for my favorite GREEN food,
Pistachio Salad, aka Green Fluff and/or Watergate Salad


Did you know that are just about as many different ways to make Pistachio fluff as there are folks who make it? I've had Pistachio Fluff on the brain ever since I had so many comments about it on my Pretty in Pink fruit salad post, so I decided to make that delectable dish known variably as "Pistachio Fluff", "Watergate Salad" and simply "that green stuff".

Back in the "olden days" of the 70's, different versions of this were all the rage. Some made it with cottage cheese, similar to the Pretty in Pink salad, some made it with miniature marshmallows, some topped theirs with chopped nuts; I've even seen it put in a pie crust. In my family, we made a very simple version, and that's the one I decided to re-create this week.


Ingredients:
  • 1 can crushed pineapple, drained
  • 1 pkg Pistachio pudding mix
  • 1 container Cool Whip or other whipped topping

Pour the drained pineapple into a medium sized mixing bowl, top with dry Pistachio pudding mix

Mix the pineapple and pudding mix together until it turns this lovely(!) shade of green


Add cool whip and stir until well blended

When you finish, it should look something like this.

At this point, it will taste like a mouth full of SWEET and not much else. Refrigerate for at least a couple of hours. The mixture will "set" slightly and the flavors will develop until it tastes like a mouth full of sweet, refreshing goodness.

It doesn't make all that much compared to the pink one, that may be one reason why many add the cottage cheese and mini-marshmallows. I like the cottage cheese in the pink one, and may try it in this one, too, but it's good just the way it is, and would be super simple to double or even triple to take to a church dinner or family gathering.

I guarantee anyone old enough to remember the 70's will remember it, and anyone not old enough to remember it will like it anyway.

This post is linked to:
Luck of the Irish Party at It's a Blog Party
Ultimate Recipe Swap at Life As Mom
Foodie Friday at Designs by Gollum

Until next time, good (un-)cooking, and good eating!

Wednesday, March 16, 2011

Quick and Easy Hamantaschen for Purim

Purim is coming up this Sunday, March 20th, so I am re-purposing this post for the occasion.


Sunday is Purim, the celebration of the deliverance of Israel from annihilation at the hand of the enemy as told in the book of Esther. As part of the celebration of God's deliverance, it's customary to give gifts of food, which often include hamentaschen, or Haman's hats, named after the villain of the piece. (hiss, hiss, stomp, clap) (In order to obliviate the very name of Haman, who schemed to destroy God's people, when the story of Esther is read or told, the audience must hiss or stomp or use noisemakers anytime his name is mentioned.)

Hamentaschen are little three cornered cookies or pastries, usually with fruit or poppy seed filling. I came up with a quick and easy version a few years ago that are actually more like a fruit tart, but made in the traditional three-cornered shape, I think they fit the bill quite nicely.


Ingredients:
  • pie crust--for this I want a smooth, even crust, so I use my old faithful ready-made crusts
  • pie filling of your choice--I like cinnamon spice apple, or blueberry
  • powdered sugar to sift over the finished product
You need a pie filling with small "bits", so when I do this with apple filling, I use my pastry cutter or a knife to cut the larger slices so that I have smaller pieces of fruit.

Use a biscuit cutter or the top of a glass to cut as many circles as you can get from your pie crust. You can take the bits that are left and re-roll and cut again, if you like.

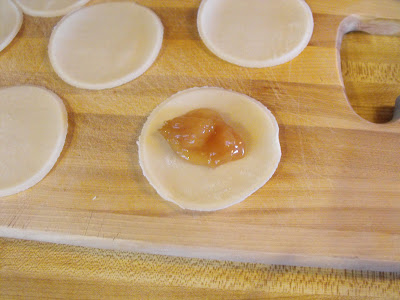
Place a small amount of the filling on each circle--I used a heaping tablespoon, and almost overfilled some of mine.

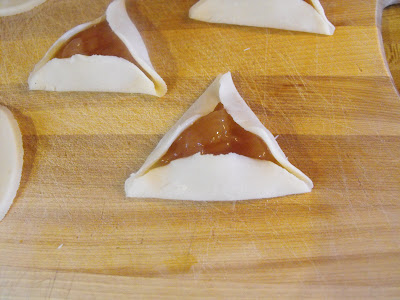
Fold the sides up into the traditional three-cornered hat shape.

It's been a couple of years since I made these, and the first batch I did started coming apart at the corners when they started baking, so I really pinched the corners together on the next batch.


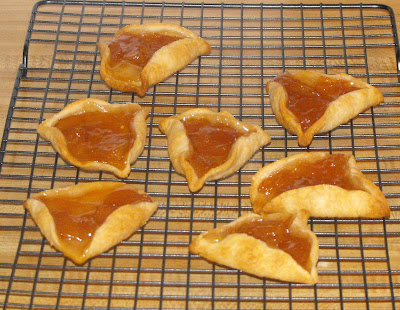
Bake at 400-450 degrees for 15-20 minutes. Remove from the baking sheet to a cooling tray. (This was the first batch--see how they started coming apart? Still tasted good, though!)


Dust with powdered sugar right before serving.

These are so good--just the right proportion of crust to filling. You can offer these alone as a finger food, or serve on a plate with little dollop of whipped cream on top, or even in a bowl with a scoop of vanilla ice cream. Just be sure to give thanks everytime you eat one that God's ear is still open and His handis working behind the scenes to bring deliverance and salvation to those that call on His name!

This post is linked to:
What's Cooking Wednesday at the King's Court IV
Foodie Friday at Designs by Gollum

Until next time--good cooking, and good eating!