Sunday, May 30, 2010

Ice Box Pickles


Looking for something different to do with fresh cucumbers? My parents have been supplying me with some delicious vegetables from their garden--including a variety of different cucumbers. A lot of gardeners make pickles with their excess cucumbers, but to be honest, I don't like most homemade pickles, this is one area that I much prefer store-bought.

I make an exception for these "ice-box" or refrigerator pickles, though!

These are not really a traditional heat-packed "pickled" cucumber, this is more like a cucumber salad with a vinegar-based dressing. They're light, delicious, and will keep almost indefinitely in the fridge. I don't even bother to put mine in jars, I just use a big Tupperware bowl that I replenish from time to time.

You'll need these ingredients:
  • 2 c sugar
  • 1 c vinegar
  • 1-2 t salt
  • 7 c thinly sliced cucumbers
  • 1 thinly sliced or chopped onion (I used the equivalent in dried onion flakes, 2 T)
  • 1 t celery seeds
In a small saucepan, mix together the sugar, vinegar, and salt, and heat just until the sugar and salt are completely dissolved, stirring constantly. Some recipes tell you to include the celery seed in this mixture--big mistake--you won't be able to scrape them all out, it makes a mess, and all about avoiding a mess in the kitchen.
Meanwhile, slice the cucumbers and onions (I used my food processor, but you could use a mandolin slicer). Spinkle the celery seed on top, along with the onion flakes if you use dried like me.

When the vinegar mixture is completely cool, pour over the cucumbers, onions, and celery seed, and stir well. You'll think at this point that this is not enough liquid for the amount of cucumbers that you have, but stir to coat as well as you can, then cover and refrigerate.
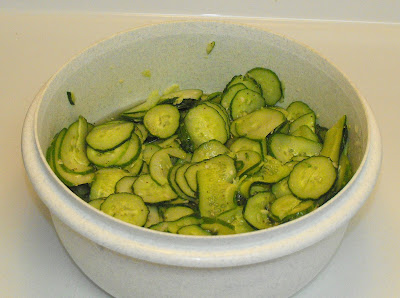
The cucumbers will wilt down slightly and release some of their juices and you'll have plenty of liquid. At this point you can put it in jars, if you like, but because they aren't heat packed or sealed, they must be kept refrigerated at all times. I usually just leave mine in the bowl. As they start to get eaten, you'll end up with lots of excess liquid--I just slice more cucumbers and add to the bowl. After a while, I discard and start a new one, but you can replenish the cucumbers at least once or twice, depending on how fast you eat them.

Variations:
My mother adds just a little diced red and/or green bell peppers to hers for color; I don't care for bell pepper, so I've never added it to mine.

I have a cousin who likes to take the same vinegar-sugar mixture and use it over a combination of cucmbers and halved grape or cherry tomatoes. I've never done this, but it sounds delicious, I can just imagine what a pretty salad it would make.

As you know if you've been reading the last couple of weeks, I'm off of sugar for a while. I made these for the first time today using Splenda instead of sugar, and they came out wonderfully! The Splenda dissolved almost immediately in the vinegar, but because the mixture was slightly cloudy, and I still needed to dissolve the salt, I heated it literally 30-60 seconds, stirring constantly. Not ony did the salt dissolve, the Splenda combined even more and the mixture became clear. Once cool, I poured it over the cucmber/dried onion/celery seed mixture and it did great. I've already tasted them, and can't wait to dig into some more later.

This recipe is linked to:
Meatless Monday at Chaya's Sweet and Savory
Tasty Tuesday at Balancing Beauty and Bedlam
Tempt My Tummy Tuesday at Blessed with Grace
Tuesdays at the Table at All the Small Stuff
What's Cooking Wednesday at Tales from the Fairy Blogmother
Foodie Friday at Designs by Gollum
Recipe Swap at The Grocery Cart Challenge
Delicious Dishes at It's a Blog Party
Whats on the Menu Wednesday at Dining with Debbie

Until next time, good cooking, and good eating!

Saturday, May 29, 2010

Sugar Free Sunday--Cheesecake!

Welcome to the second installment of my new feature, Sugar Free Sunday!

Thanks to Chaya of Chaya's Comfy Cook for linking her delicious-looking "I Can't Believe It's Not Ice Cream" recipe. This creamy, dreamy, 100% fruit-based dessert is on my list to try this week!

If you're a regular reader, you may have already seen my recipe for cheese blintzes that I posted earlier this week. I made the slightly-sweet filling sugar-free by using Splenda instead of sugar. My recipe made way too much filling for the number of blintzes I was filling, and since it was comprised mainly of cream cheese, eggs, and sweetener, I decided to use the leftover filling to attempt a crust-less sugar free cheesecake.

Basic Cheese Filling
Ingredients:
  • 2 8-oz pkgs cream cheese, softened
  • 1 15 oz container ricotta cheese
  • 4 eggs
  • 1 t vanilla
  • 1/2 c sugar (I used Splenda)

I had about 2/3 of this left, to which I added additional Splenda to taste, about another 1/2 cup.

Pour into a greased pie plate, and bake at about 325 for 30 minutes or so, or until it's set and slightly browned.

The cheesecake/pie will puff up during baking, then settle as it cools.

I ate mine with blueberries and sugar-free whipped topping...

...and then added a huge strawberry next time.
I loved this cheesecake, but it's not a typical rich and creamy cheesecake. The ricotta cheese gives it a different taste and texture, but it's still light and just slightly sweet, but just right with the addition of the berries and whipped topping. I'm going to keep experimenting with some different combinations, but for now, this was a real treat in my sugar-free world!


This post is linked to:

Foodie Friday at Designs by Gollum
Slightly Indulgent Tuesday at Simply Sugar and Gluten Free
Tempt My Tummy Tuesday at Blessed with Grace


Please feel free to link your sugar-free recipes and product reviews, I'd love to hear from you this week!


Until next time, good cooking, and good eating!

Thursday, May 27, 2010

Cheese Blintzes

My cooking, if you could call it that, has been on the skimpy side lately. I've been in a rut of making the same things over and over again, and even my own motto of "quick and easy" has been put to the test as almost anything I could think of seemed like just too much trouble. Ever have one of those days/weeks/months? Made worse, I think, because I'm trying to lose weight, and I've been in a bit of pout because I've been off of my comfort foods.

This recipe has re-lit the spark, though! I couldn't wait to get to the library today (for the high speed internet) to upload the pictures. This is the most elaborate thing I've made in a long time, but it turned out so well, I think I'm inspired to get back some good basic cooking.

I made these cheese blintzes for Shavuot last week (that's Feast of Weeks or Pentecost) when it's customary to eat dairy foods, along with fruits and vegetables that are just now being harvested. I'd made these once before a few years ago, but I "cheated" and used bought pre-made crepes, but these I made myself from scratch, so I was quite full of myself afterward!

(this is my "real" kitchen at home--old appliances and mismatched back splashes and all)
The first thing you have to do in this two-part recipe is make the unfilled basic blintzes. A blintz is a crepe that's browned only on one side, then filled with either a sweet or savory filling, and then either fried or baked. I adapted my recipe and techniques from 1,000 Jewish Recipes by Faye Levy.
Ingredients:
  • 3 large eggs
  • 1 1/3 c milk
  • 3/4 c all purpose flour, sifted
  • 1/2 t salt
  • 2-3 T butter, melted

Combine the first 4 ingredients in the blender, then blend for about 1 minute, or until the batter is smooth. Cover and refrigerate at least an hour. When you're ready to cook the blinztes, add the melted butter and blend well. This makes very thin batter, that should be completely smooth.

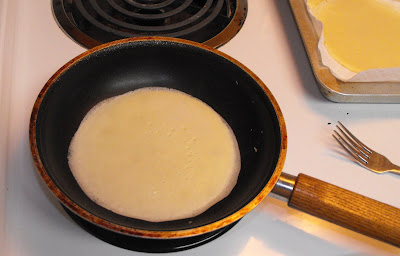
I don't have a crepe pan, so I used a small non-stick skillet. Heat on medium high heat until a drop of water sizzles when it hits the pan. Pour 2-3 tablespoons of batter in the pan, then tilt and sort of swirl the pan until it covers the bottom of the pan.

I was a bit apprehensive of this since I've never made crepes, and even my pancakes don't turn out pretty. The instructions say to cook until the bottom is slightly browned--but how in world can you tell if the bottom is brown? Not to worry--these cook up fast, not much more than a minute--and you can tell by looking as the color on top changes slight from the outside in as they cook. The edges start to lift and pull away from the pan--I used a fork to gently slide under the edge and toward the middle-when it turned loose, it was done, and slid right out of the pan. This recipe made about 15 small blintzes.

Be sure to spread these out to cool before you stack them--you probably want to put wax paper between them after they cool if you aren't going to fill them right away.

This is what the brown side of mine looked like.


For the filling, I adapted it by combining elements of several different recipes.
Ingredients:
  • 2 8-oz pkgs cream cheese, softened
  • 1 15 oz container ricotta cheese
  • 4 eggs (use only 2--4 makes it too thin)
  • 1 t vanilla
  • 1/2 c sugar (I used Splenda)

Combine all ingredients, and stir or mix until well combined and somewhat smooth. My filling was really too thin--next time I'll only use two eggs. I also had so much filling left I added some additional sugar (in my case Splenda) and made a sugar-free cheesecake (which I'll be sharing next time!)

Place a heaping spoonful or two of filling on the browned side, then fold in the sides and roll up--kind of like making a little burrito. Many people fry their filled blintzes in a small amount of oil, turning, just until they're brown on all sides and the filling is heated through. Luckily I was planning to bake these, I think the filling would have run out in the hot oil, making a huge mess.


To bake, place them in a greased or cooking-sprayed pan, cover with foil, and bake at 350-400 about 20 minutes, or until the filling is "set". Uncover, brush with melted butter, and bake for an additional 10 minutes, or until the outside is lightly brown.

For some reason, this pan browned better--or at least the picture shows the brown better (!)

And then for the best part--serve with toppings of your choice. I chose blueberries and a combination of blueberries and strawberries, with sugar-free whipped topping, but you could use any number of toppings, from other fruit to chocolate or caramel syrup. This version was so delicious, light with just enough sweetness, it has definitely become my new favorite dessert.

I loved making this dish. It was easier than I had expected, but the results were "frou-frou" enough that I felt that I really made something special. Both the blinztes and the filling can be made ahead and stored in the fridge, either separately or already filled; then either bake or fry them at the last minute to add a special touch to any meal.

This post is linked to:

Foodie Friday at Designs by Gollum

Just Something I Whipped Up at The Girl Creative

Meatless Monday at Chaya's Sweet and Savory

Tasty Tuesday at Balancing Beauty and Bedlam

Tempt My Tummy Tuesday at Blessed with Grace

Tuesdays at the Table at All the Small Stuff
Delicious Dishes at It's a Blog Party
Make it Yourself Monday at Eat From Your Pantry

Until next time, good cooking, and good eating!

(Disclosure: If you follow the link and buy Faye Levy's cookbook, I will receive a few cents comission from Amazon)

Saturday, May 22, 2010

Sugar Free Sunday


Welcome to my very first installment of Sugar Free Sunday!

As you may know if you've a regular visitor, I love my sweet stuff. Love, love, love. But unfortunately, it doesn't love me! I schedule a long over-due check up last month and discovered that my blood sugar was through the roof--I had the highest A1C level that I've ever had. To be truthful, it wasn't a surprise, I knew it was bad, but I had been rafting down that river called de-Nile. (Denial. I know, not that funny.) But that river has reached it's floodstage and I'm headed for dry ground.

And so I've sworn off sugar, for the most part, for the near future while I get my body back in balance, lose some weight, and get healthy.

I'll still be sharing recipes of all kinds, especially those quick and easy ones near and dear to my heart. In addition to those, I'm starting a new feature, called Sugar Free Sunday, to share with you the sugar-free foods I find and make along the way. Gone are the days that the little pink packets were our only option for non-sugar sweeteners, now there are all kinds packets and liquids and powders available, as well as sugar-free products. I'll be posting recipes and product reviews, and also a linking feature for others to share their sugar-free recipes with us.

This first recipe is kindergarten easy--a variation on something you can do with regular gelatin and whipped topping--I didn't want to get too ambitious my first week of dieting, I wanted something simple that I could put together in minutes, but still satisfy my craving for some thing a little more special than just plain sugar-free gelatin.

Ingredients:

  • 1 box sugar free gelatin, your choice of flavors
  • 1 c sugar free whipped topping

Mix the gelatin according to package directions, with one cup of boiling water and one cup of cold water. Refrigerate just until it gets "tacky" on top and starts to thicken ever-so-slightly.

Add one cup of sugar-free whipped topping.

Blend together with a wire wisk until the topping is incorporated into the gelatin.

Pour into your serving dish--it starts to seperate immediately--I used a glass dish so you could see the layers. Refrigerate until fully set. This takes longer than setting just gelatin, due to the added liquid. I left mine overnight.

Add an additional layer of whipped topping...

and a garnish if you'd like...

Doesn't that look pretty and refeshing?

If I were making this for company, I'd put it in a square, flat dish and cut it into squares, or maybe try individual serving dishes--I'm not sure how easy it would be to pour the mixture and get the layers even, it does start to seperate quickly.

And there you have it--my first attempt at a sugar-free "goodie".

I love the Royal brand gelatin, I got it at Walgreens 3/$1, I thought it tasted as good as more expensive brands.

The Sugar-Free Cool-Whip tasted great, too--until I really read the ingredient and discovered that while it is technically "sugar-free", the second ingredient listed is cane syrup, and it's barely any different from regular Cool Whip in carbs or sugars or calories. So I will be looking for another sugar-free whipped topping to try, or will make my own from whipping cream and sweetener.

If you have sugar-free recipes or product review to share, please add a link, I'm newly on the sugar-free bandwagon and I'd love to have some new things to try!


This post is linked to:

Meatless Monday at Sweet and Savory
Tempt My Tummy Tuesday at Blessed with Grace
Tuesdays at the Table at All the Small Stuff
Tasty Tuesday at Balancing Bedlam and Beauty

Until next time--good cooking, and good eating!

Tuesday, May 18, 2010

"Pot Roasted" Rosemary Chicken

(Be sure to check back this week for the first installment of a new series, Sugar-Free Sunday)


My parents spring potato patch has started bearing, and they've been supplying me with beautiful fresh "new" potatoes--the small round red-skinned kind. I don't think there is anything you can do with new potatoes that isn't good, but I decided to try something new for me, a twist on a traditional pot roast using chicken.

Ingredients:
  • potatoes
  • carrots
  • boneless skinless chicken thighs
  • onion flakes
  • chicken stock
  • Tony Chachere's or other all purpose seasoning blend
  • worchestershire sauce
  • Kikkoman Ponzu sauce with lime
  • liquid smoke

I used my favorite Corning Ware dish, I call it "dutch oven" sized, but I think offically it's 3 quarts. After spraying it good with cooking spray, I put a layer of peeled new potatoes, mixed with some baby carrots. (I like mine left unpeeled when they're this young, but my family likes them better peeled.) I made up a cup of chicken stock from some chicken stock paste and poured over the vegetables, and added a shake or two of Tony Chachere's Creole Seasoning (any good all-purpose seasoning blend would do) and a couple of tablespoons of dried onion flakes. Then I layered still-frozen boneless, skinless chicken thighs on top and seasoned the meat with Tony Chay-chays again, a few drops of liquid smoke, some worchestershire sauce, and a shake or two of Kikkoman Ponzu Lime sauce. Then I rubbed a couple of tablespoons of dried rosemary between my hands to crumble it a bit, and sprinkled it on top.

I covered it and baked at 400 degrees F for about 20 minutes, then lowered the heat to 350. After another 40 minutes (one hour cooking time total) I took the lid off and lowered the heat even further, to about 300 degrees, and let it cook another 20-30 minutes to brown the chicken a little and cook off just a bit of the liquid.


The chicken was tender and juicy, and vegetables well cooked but not mushy, this one is definitely a keeper.

I love one-pot meals, all this needed was a few sliced cucumbers and some microwave "steamed" summer squash (also from my parent's garden--yum!). I'll definitely be making this again, I think I may try a crock-pot version next time. (I tend to use my crock-pot more in the summer time, when I don't want to heat up my kitchen by using the oven. It's a hot-weather southern thing, I think!)

This post is linked to:
Tempt My Tummy Tuesday at Blessed with Grace
Tuesdays at the Table at All the Small Stuff
Tasty Tuesday at Balancing Bedlam and Beauty
Ultimate Recipe Swap at Life at Mom's

Until next time, good cooking, and good eating!

Thursday, May 6, 2010

Vegetables, Smedgtables

Fish Mama at Life at Mom is hosting a recipe swap this week with a vegetable theme. I don't have any new ones to post right now, but I do want to do a re-cap post and highlight some vegetable recipes I've posted in the past.

First up is my version of pan-roasted asparagus , which is my easy method of choice. Sometimes to make a variation, I squeeze on a little lemon juice, or sprinkle it with grated Parmesan cheese right at the end.

Next up is Corn Casserole, favorite of children and adults alike. I like that I can make this for my family, or double up and make a big one to take to a church supper or family reunion.

Probably my very favorite home-grown vegetable is pink-eyed purple hull peas. My parents grow these in mass quanitites during the summer heat, then put them in the freezer where they become a year-round staple for our family.


Next up is the delicious Sweet Potato Casserole--the potato casserole you can eat for dessert. Usually a fall or winter vegetable, my family requests this year round, as well.


And last but not least, the real dessert--a pie made from navy beans.


Hope you enjoy these, and don't forget to visit the Ultimate Recipe Swap at Life As Mom.
Until next time, good cooking, and good eating!